Git-命令速查与相关问题解决-Cheatsheet & Troubleshooting
目录
这篇文章包含了常年使用 Git 的经验/解决方案以及阅读《Git Pro》之后的盲点补充
常用功能
使用 PAT (Personal Access Token) 访问 repo
这样就不用每次都输入密码, 但是要注意这是明文访问, 任何人知道了 PAT 都可以访问
[remote "origin"]
	url = https://{你的PAT}@github.com/username/reponame
	fetch = +refs/heads/*:refs/remotes/origin/*
普通方法记住密码
主要是要打开这个文件: /.git/config (这个文件默认隐藏)
在这个文件末端加上这么几行:
/.git/config:
[credential]
	helper = store
以后输入密码之后就会记住
设置 Committer
git 默认会使用本地账户, 有些时候我们可能不希望用这个账户, 那么就可以通过 设置 Committer 进行账户设置
[user]
  name = John Doe
  email = email@email.com
常用命令
Git 命令速查
| 命令 | 功能 | 注释 |
|---|---|---|
| git commit -m {desc} | 提交并附带概要信息 | |
| git pull | 从远程仓库拉去代码 | |
| git push | 推送代码到远程仓库 |
git add
| 命令 | 功能 | 注释 |
|---|---|---|
| git add . | 将所有改动放进暂存区 (注意最后输入了一个点代表是当前目录) | |
| git add -i | 使用列表控制哪些文件进行 Stage | |
| git add -p | 使用列表控制决定哪些文件的, 哪些部分进行 Stage |
git push
| 命令 | 功能 | 注释 |
|---|---|---|
| git push —force | 一般如果 revert 了的话重新 push 就可能遇到 reject 那么就使用 —force |
git commit
| 命令 | 功能 | 注释 |
|---|---|---|
| git commit —amend -m “{msg}“ | 修改最后一次 commit 的 msg |
git merge
| 命令 | 功能 | 注释 |
|---|---|---|
| git merge | Merge 之后会生成一段 merge 的 log, 记得要 git commit 然后 push 一下才会有变化 | |
| git merge —abort | 退出当前 merge 并还原 |
git log
| 命令 | 功能 | 注释 |
|---|---|---|
| git log | 最常用的显示日志 | |
| git log -p | 显示日志并显示修改细节 | |
| git log -p -3 | 显示最近3条日志的修改细节 | |
| git log —pretty=format:“%h - %an, %ar : %s” | 使用特定格式来输出 | |
| git log master..experiment | 查看在 experiment 分支中而不在 master 分支中的提交, 这个用法很好, 可以用于 cherry pick 的检查 | |
| git log origin/master..HEAD | 查看即将推送到远端 master 分支的内容 | |
| git log origin/master.. | 留空部分会自动当成 HEAD | |
| git log refA..refB | 左侧三个命令是等价的 | |
| git log ^refA refB | ||
| git log refB —not refA` | ||
| git log refA refB ^refC | 查看所有被 refA 或 refB 包含的但是不被 refC 包含的提交 | |
| git log refA refB —not refC | ||
| git log master…experiment | 查看 master 或者 experiment 独有的提交, 取出两个分支所有的提交并排除交集, 不建议使用这个命令而应该使用下面这个↓ | |
| git log —left-right master…experiment | 同上, 不过显示更清晰 |
git stash
git stash默认执行git stash push,git stash save已经 deprecated 可以用git stash push取代- 注意git 文件有三种状态:
Staged: 已修改已保存,Unstaged: 已修改未保存,Untracked: 新文件
| 命令 | 功能 | 注释 |
|---|---|---|
| git stash | 无脑保存修改, 仅仅 新添加 (untracked) 的文件不会 stash, 随后 git pop 的时候也不会自动恢复 staged 状态 | |
| git stash -k | 仅仅保存 unstaged 的文件 | |
| git stash —keep-index | 同上 | |
| git stash — $(git diff —staged —name-only) | (特殊用法) 仅仅保存 staged 的文件 | |
| git stash -u | Stash 并且包含 untracked 文件 | |
| git stash -p | 开始进行逐个文件检查, 并且决定部分 Stash | |
| git stash -all | 全部已修改的内容都推进暂存区 | |
| git stash branch [branchname] | 将已经 stash 的内容转变为一个分支. | |
| git stash pop | ||
| git stash list | 查看 Stash List | |
| git stash apply [stash@{X}] | 应用某个特定的 Stash | |
| git stash apply [stash@{X}] —index | 应用某个特定的 Stash, 并恢复已经 Stage 的状态 (应该多使用这个方法) | |
| git stash whow [stash@{X}] | ||
| git stash drop [—quiet] [stash@{X}] | ||
| git stash drop [—quiet] [stash@{X}] |
Partial Stash
git stash save -p "my commit message" # 将部分文件 stash, 需要一个一个决定是否 stash然后输入关键字逐个决定是否 stash:
  y - stash this hunk
  n - do not stash this hunk
  q - quit; do not stash this hunk or any of the remaining ones
  a - stash this hunk and all later hunks in the file
  d - do not stash this hunk or any of the later hunks in the file
  g - select a hunk to go to
  / - search for a hunk matching the given regex
  j - leave this hunk undecided, see next undecided hunk
  J - leave this hunk undecided, see next hunk
  k - leave this hunk undecided, see previous undecided hunk
  K - leave this hunk undecided, see previous hunk
  s - split the current hunk into smaller hunks
  e - manually edit the current hunk
  ? - print help
git checkout
| 命令 | 功能 | 注释 |
|---|---|---|
| git checkout {branch name} | 切换本地分支 (如果没有的话就新建分支) | |
| git checkout -b {branch name} |
git pull/fetch
| 命令 | 功能 | 注释 |
|---|---|---|
| git pull origin {remote branch name} | fetch 并且 merge 远程分支 | |
| git fetch origin {remote branch name} | 仅仅 fetch 远程分支 |
git branch
| 命令 | 功能 | 注释 |
|---|---|---|
| git branch {bch name} | 直接创建本地分支 | |
| git branch -a | 查看所有的分支 | |
| git branch -r | 查看远程所有分支 |
git reset
| 命令 | 功能 | 注释 |
|---|---|---|
| git reset {commit} | Reset 到某个 commit, 文件不变动 | 如果某一步 commit 错误就用这个,不要用 —hard |
| git reset {commit} —hard | Reset 到某个 commit, 文件也变成对应的 version |
git diff
| 命令 | 功能 | 注释 |
|---|---|---|
| git diff | CLI 显示对应的 diff | |
| git diff {commit1} {commit2} | CLI 显示两个 commit 之间的 diff | |
| git diff > 123.diff | 将对应的未 commit 的内容 diff 输出到 123.diff | |
| git apply 123.diff | 将 123.diff 的内容提交回当前分支, 如果其中一个文件失败则回退 |
git skip-worktree
和 assume-unchanged 不同点: assume-unchanged 在 reset 的时候会一起 reset, 但是 skip-worktree 就不会这样了。
git update-index --skip-worktree .env
git ls-files -v | grep ^S
git assume-unchanged
对于单个文件应用
这个用法的缺陷就是一次只能选一个文件.
| 命令 | 功能 | 注释 |
|---|---|---|
| git update-index —assume-unchanged /path/to/file | 忽略跟踪某个特定文件, 特别是 windows 下面 package. json 的临时修改每次都要 stash | |
| git update-index —no-assume-unchanged /path/to/file | 重新开始跟踪某个特定文件 |
对应文件夹应用
不包含子文件夹的方式
这个方式不包含子文件夹
# cd 到想要忽略的文件夹.
`ls | xargs -l git update-index --assume-unchanged`
包含子文件夹的方式
git ls-files -z YOURFOLDER/ | xargs -0 git update-index --assume-unchangedgit rename
| 命令 | 功能 | 注释 |
|---|---|---|
| git mv “原文件名” “新文件名” | 修改文件名, 这样 commit 里面就不会出现一条多余的删除和添加. |
git cherry-pick
| 命令 | 功能 | 注释 |
|---|---|---|
| git cherry-pick {commit id} | cherry pick 某个特定 commit, 这个就是将 commit 的修改直接叠在当前分支上, 不进行任何 rebase | |
| git cherry-pick {commit id1} {commit id2} | cherry pick 多个特定 commit, 使用空格分割, 另外其实多个 commit id 的前后顺序不重要因为对应的 commit id 会按照时间叠加 | |
| git cherry-pick -n {commit id} | cherry pick 某个特定 commit 但是不进行 commit, 就是直接添加到 changes | |
| git cherry-pick —continue | cherry pick 的时候如果遇到 conflict, 那么会中断然后需要 merge, merge 之后 commit 之后就可以 continue, 如果要退出 cherry-pick, 那么就是用 —abort |
git config
Git Config 的检索流程:
- Git 目录下的配置文件
.git/config, 对应参数是--local - 用户的
~/.gitconfig文件 (或者~/.config/git/config文件), 对应参数是--global - 系统级的
/etc/gitconfig文件, 对应参数是--system
| 命令 | 功能 | 注释 |
|---|---|---|
| git config —list | 查看相关配置 | 本地配置的位置是在 .git/config, Global 的配置位置在 ~/.gitconfig |
| git config —list —show-origin | 查看相关配置 | |
| git config —global core.editor emacs | 修改默认编辑器 | |
| git config —global core.editor “vim” | 修改为 VIM | |
| git config —global core.editor “code —wait” | 修改为 VSC, 并且会等待 VSC 编辑完成 |
给特定项目设置特定的 user:
这部分也可以到
.git/config添加以下内容
git config user.name "what ever"
git config user.email anyone@anysite.any  # 需要注意的是随后的提交就会按照这个 email 来设置, user.name 很可能会被复写
git config --global user.name "what ever"
git config --global user.email anyone@anysite.any
git grep
git grep -n [keyword] # 代码中查找和keyword相关的内容,并且显示行号设置代理
# 查看当前代理设置

git config --global -l

git config --global https.proxy http://127.0.0.1:1080
git config --global https.proxy https://127.0.0.1:1080
git config --global http.proxy 'socks5://127.0.0.1:1080'
git config --global https.proxy 'socks5://127.0.0.1:1080'

# 如果代理需要权限的话如这样子写
git config --global https.proxy https://username:password@proxy.baidu.com:8080


# 取消代理
git config --global --unset http.proxy
git config --global --unset https.proxy
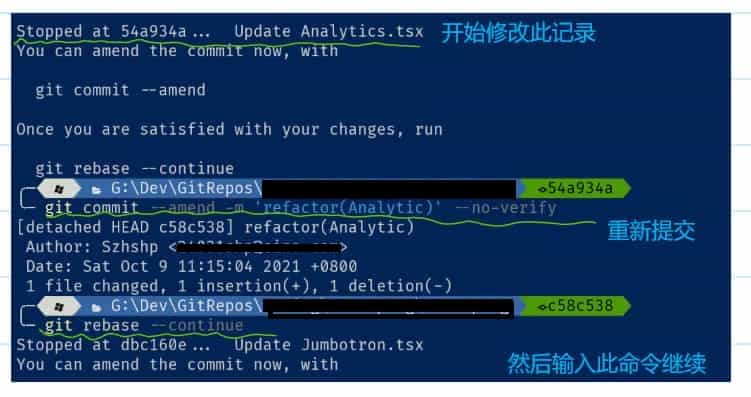
git rebase: 修改 Log
- 首先找到一条 commit ID
- 输入
git rebase -i [commit id]开始修改 [最新的 commit] 到 [这个 ID] 之间的记录 (不包含这个 commit) - 或者也可以输入
git rebase -i HEAD~10来修改最近的 10 条记录
- 输入
- 然后会显示一个 TODO 文本文件, 需要编辑这个文件
- 默认会使用 Nano 在命令行里面编辑
- 使用
git config --global core.editor "code --wait"可以切换成 VSCode 编辑 3. Mac 上面没有自动将 code 加入到环境变量,这个时候就需要额外跑到 VSC 使用 Ctrl+Shift+P 选择Install 'code' command in PATH command - 也可以直接跑到
.git\rebase-merge\git-rebase-todo并且用 VSC 编辑
- 将需要修改的 log 的 pick 改为 e (edit)
- 可以上下调节 commit 顺序
- 将需要合并的 log 的 pick 改为 s (suqash), 其中需要注意的是 s 底部必须要有一条
非 s 的 log, 因为合并必须要有一个地基 - 然后 git 会按照顺序一个个显示处理
- 每个都需要执行
git commit --amend或者git commit --no-edit- 一般都是需要修改提交内容, 所以一般都会使用
git commit --amend -m 'message'
- 一般都是需要修改提交内容, 所以一般都会使用
- 然后执行
git rebase --continue继续 - 全部修改完成之后需要强制推上去
git push --force
| 命令 | 功能 | 注释 |
|---|---|---|
| git rebase -i [commit id] | 在这里选择一个特定的 commitID, 只会选中这个 commitID 之后的子提交 | |
| git rebase -i -root | 因为不会选中当前 commit, 如果要修改最初始的 commit 就要像这样写, 然后在对应的日志里面将 pick 改成 edit | |
| git commit —amend —author “用户名 <邮箱@sina.com>“ | 然后对修改过的这些 commit 重新提交一次. | |
| git commit —amend | 每一个 edit 都要执行一次 | |
| git rebase —continue | ||
| git push -f | 然后就会看到所有的 commit 都显示了 conflict, 这部分最终要 force push 上去, 不过还是要小心一些 |
具体操作:
git rebase -i [commit id]- 在对应的日志里面将 pick 改成 edit
git commit --amend --author "用户名 <邮箱@sina.com>"重新提交git log检查git rebase --continue完成git push -f覆盖旧日志
清空目录
| 命令 | 功能 | 注释 |
|---|---|---|
| git clean | 要谨慎使用这个命令, 会将所有未跟踪的文件删除. 好的选择是使用下面这一段 stash all 来保存 | |
| git stash -all |
批量改写日志
批量改写提交人:
将提交人邮箱为
abc@XXX.com的提交人信息全部改写
git filter-branch --commit-filter '
  if [ "$GIT_AUTHOR_EMAIL" = "abc@XXX.com" ];
  then
          GIT_AUTHOR_NAME="xxxx";
          GIT_AUTHOR_EMAIL="def@XXX.com";
          git commit-tree "$@";
  else
          git commit-tree "$@";
  fi' HEAD
这一段内容改写完毕之后, 会出现大量的重复提交
切记先将其推到一个分支里面, 再进行测试.
测试完毕之后, 可以将 master 的分支给覆盖掉.
Reference
git commit -am "init" 提交并且加注释
git remote add origin git@192.168.1.119:ndshow
git push origin master 将文件给推到服务器上
git remote show origin 显示远程库 origin 里的资源
git push origin master:develop
git push origin master:hb-dev 将本地库与服务器上的库进行关联
git checkout --track origin/dev 切换到远程 dev 分支
git branch -D master develop 删除本地库 develop
git checkout -b dev 建立一个新的本地分支 dev
git merge origin/dev 将分支 dev 与当前分支进行合并
git checkout dev 切换到本地 dev 分支
git remote show 查看远程库
git add .
git rm 文件名 (包括路径) 从 git 中删除指定文件
git clone git://github.com/schacon/grit.git 从服务器上将代码给拉下来
git config --list 看所有用户
git ls-files 看已经被提交的
git rm [file name] 删除一个文件
git commit -a 提交当前 repos 的所有的改变
git add [file name] 添加一个文件到 git index
git commit -v 当你用-v 参数的时候可以看 commit 的差异
git commit -m "This is the message describing the commit" 添加 commit 信息
git commit -a -a 是代表 add, 把所有的 change 加到 git index 里然后再 commit
git commit -a -v 一般提交命令
git log 看你 commit 的日志
git diff 查看尚未暂存的更新
git rm a.a 移除文件 (从暂存区和工作区中删除)
git rm --cached a.a 移除文件 (只从暂存区中删除)
git commit -m "remove" 移除文件 (从 Git 中删除)
git rm -f a.a 强行移除修改后文件 (从暂存区和工作区中删除)
git diff --cached 或 $ git diff --staged 查看尚未提交的更新
git stash push 将文件给 push 到一个临时空间中
git stash pop 将文件从临时空间 pop 下来
-------------------
git remote add origin git@github.com:username/Hello-World.git
git push origin master 将本地项目给提交到服务器中
---------------------
git pull 本地与服务器端同步
---------------------------
git push (远程仓库名) (分支名) 将本地分支推送到服务器上去.
git push origin serverfix:awesomebranch
----------------------------
git fetch 相当于是从远程获取最新版本到本地, 不会自动 merge
git commit -a -m "log_message" (-a 是提交所有改动, -m 是加入 log 信息) 本地修改同步至服务器端
git branch branch_0.1 master 从主分支 master 创建 branch_0.1 分支
git branch -m branch_0.1 branch_1.0 将 branch_0.1 重命名为 branch_1.0
git checkout branch_1.0/master 切换到 branch_1.0/master 分支

git branch -r -d branch_remote_name 删除远程 branch
---------------------

mkdir WebApp
cd WebApp
git init 本地初始化
touch README
git add README 添加文件
git commit -m 'first commit'
git remote add origin git@github.com:daixu/WebApp.git
Troubleshooting
Unable to create ‘E:/xxx/.git/index.lock’: File exists.
解决方案: 在. git 同级目录, 执行 rm -f .git/index.lock 将文件删除即可提交成功
Windows 环境下更新 PAT
开始菜单-搜索凭据管理器, 到里面把 Github 相关的账号删掉, 下次使用 git 的之后就会弹出要求重新输入新的 PAT
Github Desktop 无法 force push
换 cli 处理吧
Git 内部原理
(点击显示大图)