优雅地乱玩Atom-2-插件
老规矩,玩坏了我不负责ヾ(´∀`o)+
插件安装方法:1. setting 内部搜索安装 2. 上 github 下载插件,放在 atom 目录下的 package,重开打开软件会自动识别
- 使用 apm 命令安装,例:apm install run-in-browser
主要是前端的 Package 见鬼, 随便一个插件就能写一篇 Post o(
 ̄▽ ̄)o
|Name|Functions|Comments| |----|| |Emmet||不认识这插件?你真的是程序员?| |autoprefixer|用来补充 css 前缀|| |docblockr|注释插件| |atom-terminal|从当前项目处运行 Terminal|| |autoclose-html|自动输入尾 tag|| |atom-beautify|格式整理插件|功能比较多并且比较复杂, 甚至可以 Beautify on Save| |jquery-snippets|各种语言的 snippets|| |markdown-writer|静态博客的写作工具||
看一个官方的视频就能学会一切用法: https://emmet.io/
https://atom.io/packages/atom-beautify#beautify-on-save
这是一个全能的格式整理插件, 支持大多数语言
快捷键: Ctrl-Alt-B
选择代码格式化或者全部格式化
这按钮真别扭, 建议改成 Ctrl+Shift+F
进入设置: Setting-Package-'atom-beautify'
然后找到对应语言, 然后开启Beautify On Save
然后任何时候只要按下Ctrl+S就会自动整理代码
体验了一下似乎依然需要微调, 例如 Markdown 的自动美化, 如果我设定了特殊的表格 Class 那么表格代码就会乱掉
https://atom.io/packages/markdown-writer
这是个博客 Markdown 写作神器, 最重要的是这个功能还可以集成到各个博客平台
懒得翻译了看原文吧
Go to Settings (
cmd-,) -> Packages ->Markdown-Writer-> Settings.
If you do not see any settings (due to a Atom's bug), please activate Markdown-Writer using command (e.g.
Open Cheat Sheet). Close and reopen the Settings page.
To manage tags/categories in front matter, please follow this setup.
To manage all configurations (e.g. project specific settings, change italic text styles), refer to this wiki document.
- Continue lists when you press
enter.
- Insert link (
shift-cmd-k) and automatically link to the text next time.- Insert inline link.
- Insert reference link with title. Use
-in title field to create an empty title reference link. - Remove link (and its reference) after URL is deleted.
- Search published posts by title in your blog.
- Insert footnote (
markdown-writer:insert-footnote), and edit footnote labels. - Insert image (
shift-cmd-i), auto-detect image height/width, and optionally copy images to your site's images directory. - Insert table (
markdown-writer:insert-table), and a shortcut to jump to next table cell (cmd-j cmd-t). - Format table (
markdown-writer:format-table) with table alignments. - Toggle headings:
ctrl-alt-[1-5]to switch amongH1toH5. - Toggle text styles (customization supported):
code(cmd-')- bold (
cmd-b) - italic(
cmd-i) strike through(cmd-h)'''code block'''(shift-cmd-")<kbd>key</kbd>(cmd + k)- unordered list(shift-cmd-U)0. ordered list(shift-cmd-O)> blockquote(shift-cmd->)- [ ] task list(markdown-writer:toggle-task)
- Jumping commands:
- Jump to previous heading (
cmd-j cmd-p) - Jump to next heading (
cmd-j cmd-n) - Jump to next table cell (
cmd-j cmd-t) - Jump to reference marker/definition (
cmd-j cmd-d)
- Jump to previous heading (
- Markdown cheat sheet (
markdown-writer:open-cheat-sheet). - Correct order list numbers (
markdown-writer:correct-order-list-numbers). - Open link under cursor in browser (
markdown-writer:open-link-in-browser), and works on reference links. - Toolbar for Markdown Writer is available at tool-bar-markdown-writer.
- AsciiDoc support with language-asciidoc.
You can find and trigger all features in:
- Open Command Palette (
shift-cmd-P), enterMarkdown Writer
- Or, go to menubar
Packages -> Markdown Writer.
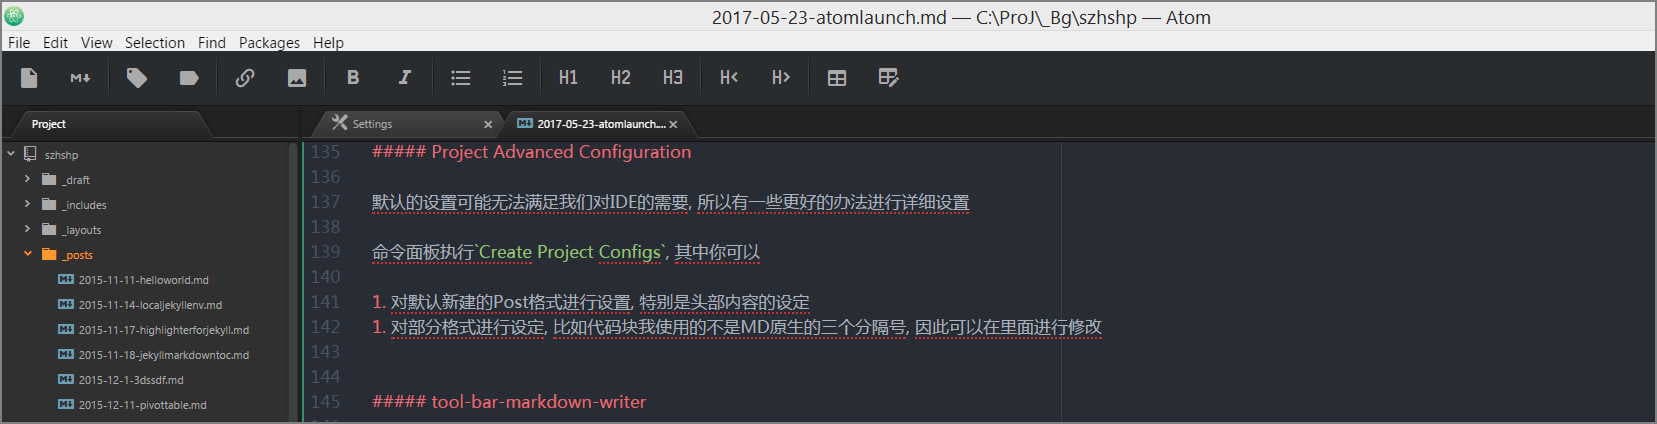
默认的设置可能无法满足我们对 IDE 的需要, 所以有一些更好的办法进行详细设置
命令面板执行Create Project Configs, 其中你可以
- 对默认新建的 Post 格式进行设置, 特别是头部内容的设定
- 对部分格式进行设定, 比如代码块我使用的不是 MD 原生的三个分隔号, 因此可以在里面进行修改
这是一个对于 markdown-writer 的扩展, 可以显示一个 GUI 的控制栏, 比较懒不愿意记快捷键就可以使用这玩意
你需要安装以下两个 Package:
- markdown-writer
- Tool-bar
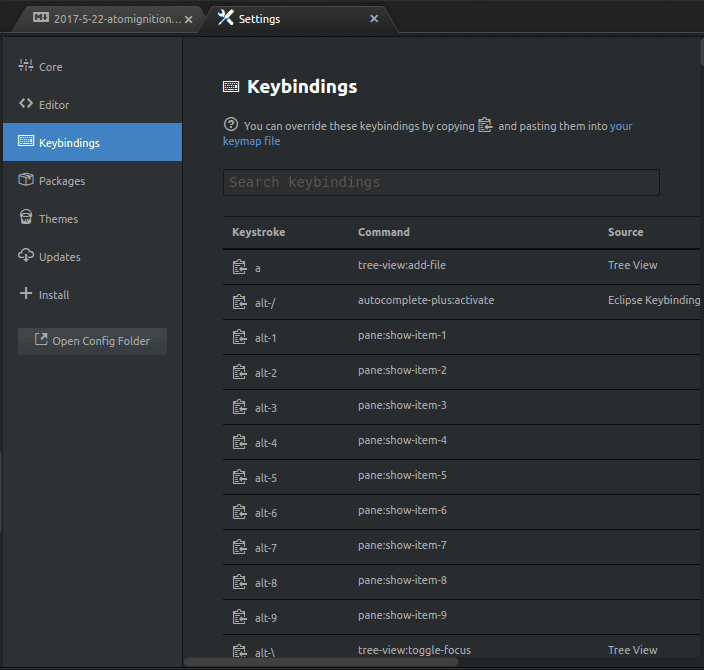
命令面板执行Create Default Keymaps
这个命令会生成一堆重载了的keymap设置到 Atom 的keymap中
快捷键设置之后效率大有提升, 到这一步已经可以代替为知笔记的 Markdown 编辑器
有了快捷键谁还用上面的 tool-bar? o(
 ̄▽ ̄)o
|Name|Functions|Comments| |----|| |file-icons|增加许多图标,在侧边栏文件名前面的 icon|| |activate-power-mode|很逗逼的编码特效,可以玩玩|
|Name|Functions|Comments| |----|| |git-plus||几个 Git 的插件需要提前安装 Git bash 到系统| |git-control|Atom 里面的 Git GUI 控制器| |minimap||| |markdown-Preview|| |linter|| |linter-JS|| |linter-JS-standard|| |sync-settings|配置同步插件|| |open-recent|开启最近打开的文件||
首先要安装 Git(废话)
如果 Git 安装失败或者环境变量没有设置的话就要到对应 Package 的设置里面设定 Git-Bash的路径
有时候会找不到 git-plus 的 setting 按钮, 可能是因为当初安装不完全, 卸载重装一次即可
一开始设置路径为
C:\Git\bin一直失败, 后来才发现必须要详细到对应git.exe, 因此路径应该是C:\Git\bin\git.exe
这样就可以使用了
配合之前的 Markdown 编辑器使用, 可以快速预览
Atom 自带的Markdown-Preview性能不太好, 这个插件可以解决两边滚动不同步的问题
这是一个对代码格式进行验证的 Package
看起来很厉害因为他会将你所有的代码进行规范化验证, 如果那里不规范就会显示出来……
然鹅我觉得挺烦的, 因为每一行代码这个插件都说我不合规. o(
不过可以修改规范细节, 甚至可以根据自己的需要设定规范
这个插件可以在下一次开启 Atom 的时候打开最近开启的文件
默认没有这功能
这是一个可以同步当前 Atom 设置的 Package, 可以让自用的电脑和工作的电脑配置进行同步
- Open Sync Settings configuration in Atom Settings.
- Create a new personal access token which has the
gistscope and be sure to activate permissions: Gist -> create gists. - Copy the access token to Sync Settings configuration.
Create a new gist:
The description can be left empty. It will be set when invoking the
backupcommand the first time.Use
packages.jsonas the filename.Put some arbitrary non-empty content into the file. It will be overwritten by the first invocation of the
backupcommandSave the gist.
- Copy the gist id (last part of url after the username) to Sync Settings configuration.
注意 gistID 就是 url 里面一串乱七八糟的东西:
https://gist.github.com/szhshp/94a324d3a35340d7179f619638fbc1e
就是后面的94a324d3a35340d7179f619638fbc1e
然后使用命令行搜索Sync Setting就可以进行 Backup 和 Restore 了, 可以同步全部的设置,包括 Package、Keymap 以及 StyleSheet